Integration guide
This document describes how to integrate fino.sign API v1 into your application, so you can use our service to digitally sign documents.
This guide describes one way of integrating our API into your application. For a full reference about all of our API resources and endpoints, please refer to our API Documentation.
API Documentation: https://api.finosign.de/docs/v1
Authentication
With the purchase of our services your company will be registered with fino.sign. For your company, you can create one or multiple apps. Apps help separating environments and/or products. For each App you can create one or multiple app-tokens, that can be used to authenticate against our API. App-tokens are considered confidential and must not be exposed to end users. If an app-token is exposed by accident, it must be revoked immediately.
Note: Currently there is no way for you to manage your apps and app-tokens by yourself. This is a feature that we are currently working on with high priority and will be available in the near future. To acquire tokens for your use-case, please contact us directly.
Authentication happens via the HTTP-Authorization header:
Authorization: Bearer <token>
This token is required in every request to our API. If the token is missing, expired or invalid, the API will respond with a 401 Unauthorized status code.
Heads up! For testing purposes we highly recommend you to use an app-token of a sandbox app. Sandbox apps are designed for testing and allow you to use our API without producing cost. When using a sandbox app our API behaves exactly the same way as with a normal app.
Step 1 - Creating a Signature
Every new signing process starts with creating a new Signature. A Signature is an API-Resource that represents a single signing process. Any resource created in the following steps will be related to this API-Resource.
To create a Signature, use the "Create Signature" endpoint:
$signature = Http::post("$apiUrl/v1/signatures", [
    'quality' => 'SES',
    'title'   => 'Lorem Ipsum Signature',
])->json('data');
What's in this request?
| Parameter | Description |
|---|---|
quality |
This parameter provides the quality of the signature. It accepts three values SES, AES and QES. More Information. |
title |
This is an optional parameter which provides a custom title shown to signers in the signing process. |
The request creates a new signature resource. The API responds with status 201 - Created and provides a JSON-Payload
which contains the Signature API-Resource. The most important part of that response is the ID of the signature. The ID
will be required for creating additional resources that are related to this signature.
$signatureId = $signature['id'];
Step 2 - Uploading a Document
A signature can contain one or multiple documents. Documents uploaded to this signature process will be signed by the signing users.
To upload a document, use the "Upload document(s)" endpoint:
Note: this endpoint is an exception as it only accepts multipart/form-data. Form data allows for binary
transmission of the documents and does not require any additional encoding.
$file = file_get_contents('document_to_sign.pdf');

$uploadedFiles = Http::asMultipart()
    ->attach('files[]', $file, 'document_to_sign.pdf')
    ->post("$apiUrl/v1/signatures/$signatureId/documents")
    ->json('data');
What's in this request?
| Parameter | Description |
|---|---|
files[] |
An array of files to be uploaded. The filetype must be application/pdf and a single file must not exceed a filesize of 50 MiB |
The request uploads the binary data and attaches the document to the signature. The API responds with status
201 - Created and provides a JSON-Payload which contains the Document-API-Resource. The API resource contains a
SHA-256 checksum in data[n].file_hash. You can use that checksum to check the integrity of the uploaded file.
$expected = hash_file('sha256', 'document_to_sign.pdf');

if (! hash_equals($expected, $uploadedFiles[0]['file_hash'])) {
    // Handle error
}
Step 3 - Add Signer
Entities that are supposed to sign the documents (i.e. fulfilling the signing process), are represented as Signer Resources. A Signature Resource needs at least one Signer Resource in order to be opened.
There are two ways how Signer Resources can be created. One way is to create them along with the Signature Resource itself (see advanced section). Another way is to use the "Create Signer(s)" endpoint:
Http::post("$apiUrl/v1/signatures/$signatureId/signers", [
    'signers' => [
        [
            'firstname'             => 'Jane',
            'lastname'              => 'Doe',
            'email'                 => 'jane@doe.com',
            'redirect_url_success'  => 'https://example.com/signature?status=signed',
            'redirect_url_error'    => 'https://example.com/signature?status=error',
            'redirect_url_declined' => 'https://example.com/signature?status=declined',
        ]
    ]
]);
What's in this request?
| Parameter | Description |
|---|---|
signers |
An array where each entry contains the data for a new Signer Resource to be created |
signers[].firstname |
The first name of the signing entity |
signers[].lastname |
The last name of the signing entity |
signers[].email |
An E-Mail address that the signing entity can be contacted with. Must be unique across all signers of a signature resource |
signers[].redirect_url_success |
A URL that the signing entity will be redirected to once they have successfully completed their signing process |
signers[].redirect_url_error |
A URL that the signing entity will be redirected to in case of an unexpected error while signing the document |
signers[].redirect_url_declined |
A URL that the signing entity will be redirected to when they have declined their signature |
There are more parameters that can be set in this request. Please refer to the official API-Documentation for further information about this endpoint.
Note: If the Signature Resource is of an application with sandbox mode enabled, signers may have redirect URLs with the insecure HTTP-Protocol. For any other case (i.e. production) redirect URLs must use the HTTPS-Protocol.
The request creates one or multiple Signer Resources and the API responds with 201 - Created and provides a
JSON-Payload which contains the created Signer Resources.
Step 4 - Open Signature
Finally, the signature has to be "opened". Currently, the created Signature Resource is in preparation stage. In this
stage, resources related to this Signature Resource as well as the Signature Resource itself may be created, modified
and/or deleted. Once a Signature Resource has reached the open stage it and its resources can no longer be modified.
Opening a signature also triggers some internal processing such as document merging and document image generation. To open a signature use the "Open Signature" endpoint:
$signature = Http::post("$apiUrl/v1/signatures/$signatureId/open")->json('data');
The request opens the signature changing the stage from preparation to open. The API responds with 200 - OK and
provides the Signature Resource including the Signer Resources as JSON-Payload.
Note: We do not contact any of the signing entities to inform about the open signature. See below for further information.
Step 5 - Notify Signer
Once a signature has been opened, every Signer Resource gets its own dedicated Magic-Link that allows them to start their part of the document signing process. These Magic-Links should be considered confidential. They can be retrieved from the response of the "Open Signature" endpoint (see above):
foreach ($signature['signers'] as $signer) {
    $signingUrl = $signer['signing_url'];

   // Notify the signer (e.g. send an E-Mail)
}
Step 6 - Receive Webhook
fino.sign offers a webhook function, through which you can receive callbacks for multiple signature-related events. The
event is identified by a name provided within the X-Finosign-Event header. See below for further information regarding
the available events. Please always check the header as more Events with differing payloads will be implemented in the
future.
Note: Your webhook should only return a non 2xx status when an error occurred. If the webhook returns a non 2xx
status the request will be considered failed and tried again after some time. This process repeats for up to 24 hours
after the initial request.
Note: Webhooks do not use authentication by default. If authentication is desired, refer to
Webhook Security to learn what authentication mechanisms are supported.
Heads up! Keep in mind that our application can't reach your local domain. Read this article to find a solution: https://medium.com/@les.jackson/3-ways-to-develop-locally-with-webhooks-822c7fc45c2a
SIGNATURE_UPDATE Event
This event occurs every time the signature status changes.
The call contains the Signature Resource including the Signer Resources as a JSON-Payload:
{
    "data": {
        "id": "7BcBmWTFqlBp",
        "quality": "SES",
        "status": "preparation",
        "withdraw_reason": null,
        "title": null,
        "webhook_url": null,
        "created_at": "2025-02-28T11:20:21.000000Z",
        "updated_at": "2025-02-28T11:20:21.000000Z",
        "signers": [
            {
                "id": "DbC8ZDzeorsd",
                "signature_id": "7BcBmWTFqlBp",
                "order": 1,
                "title": null,
                "firstname": "Ana",
                "lastname": "Hagenes",
                "fullname": "Ana Hagenes",
                "email": "agottlieb@example.org",
                "mobile_number": null,
                "status": "open",
                "decline_reason": null,
                "signing_url": "https://api.finosign.de/v1/signatures/7BcBmWTFqlBp/sign/yRPrxg31NX",
                "redirect_url_success": null,
                "redirect_url_error": null,
                "redirect_url_declined": null,
                "certificate_serial_number": "8329824ca478d2",
                "certificate_fingerprint": "cf0d16e64e04aee4fa715dcf1ede8515f4da1536e35ea70c2169aa262ef5467d",
                "created_at": "2025-02-28T11:20:21.000000Z",
                "updated_at": "2025-02-28T11:20:21.000000Z"
            }
        ]
    }
}
SIGNER_UPDATE Event
This event occurs every time the status of a signer changes.
{
    "data": {
        "id": "liy0qCZX4DbC",
        "signature_id": "1YEDE8bk6KiA",
        "order": 1,
        "title": null,
        "firstname": "Katheryn",
        "lastname": "Langworth",
        "fullname": "Katheryn Langworth",
        "email": "merlin.gibson@example.org",
        "mobile_number": null,
        "selected_ident_method": {
            "type": "nect",
            "title": "Nect",
            "price": 500
        },
        "status": "signed",
        "decline_reason": null,
        "signing_url": "https://api.finosign.de/v1/signatures/1YEDE8bk6KiA/sign/9rvjiU9PmH",
        "redirect_url_success": null,
        "redirect_url_error": null,
        "redirect_url_declined": null,
        "certificate_serial_number": "4146c6",
        "certificate_fingerprint": "945f4d262171b2612b616eed4c412b668e38b8e5590d1da50838a1f1b3271999",
        "created_at": "2025-02-28T12:48:07.000000Z",
        "updated_at": "2025-02-28T12:48:07.000000Z"
    }
}
Step 7 - Download Signed Document
Once the Signature Resource has reached the signed stage (also indicated by a webhook call, see above), the signed
documents are ready to be downloaded. To know which documents to download the Document Resources need to be retrieved
from our API through the "List all documents" endpoint:
// You can get the "signatureId" from the webhook payload
$documents = Http::get("$apiUrl/v1/signatures/$signatureId/documents")->json('data');
The API will provide an array of Document Resources that belong to the signature. To retrieve the actual binary data (i.e. contents) of each document use the "Download Document" endpoint:
Note: This endpoint is only available for Signature Resources that have reached the signed stage.
foreach ($documents as $document) {
    $documentId = $document['id'];
    $documentContent = Http::get("$apiUrl/v1/signatures/$signatureId/documents/$documentId/download")->body();

    /*
     * Save the document content (you can retrieve information about the document such as MIME-Type, filename,
     * SHA-256 hash through the Document Resource)
     */
}
Advanced
Create Signer Resources with Signature Resource
If signers are known when creating a new signature, they can be created directly with the Signature Resource:
$signature = Http::post("$apiUrl/v1/signatures", [
    'quality' => 'SES',
    'title'   => 'Lorem Ipsum Signature',
    'signers' => [
        [
            'firstname'             => 'Jane',
            'lastname'              => 'Doe',
            'email'                 => 'jane@doe.com',
            'redirect_url_success'  => 'https://example.com/signature?status=signed',
            'redirect_url_error'    => 'https://example.com/signature?status=error',
            'redirect_url_declined' => 'https://example.com/signature?status=declined',
        ]
    ]
])->json('data');
When providing a signers array along with the usual "Create Signature" request, entries of that array will be used
to create Signer Resources. Creating signers through the "Create Signature" endpoint, offers the same features as
creating signers through the "Create Signer" endpoint.
The "Create Signature" endpoint will return with 201 - Created and provides a JSON-Payload, that contains the created
Signature Resource as well as the created Signer Resources.
$signatureId = $signature['id'];
$signers = $signature['signers'];
Signer Order
In some scenarios it is required that one signing entity (or a group of signing entities) must successfully sign a
document before another signing entity (or group of signing entities) are allowed to sign the document. The order
parameter of a Signer Resource can be used to achieve this behavior.
The order parameter is an integer (starting at 1) that Signer Resources will be grouped by. The Order will be
processed in ascending order. If the order parameter is omitted when creating a signer resource, it defaults to 1.
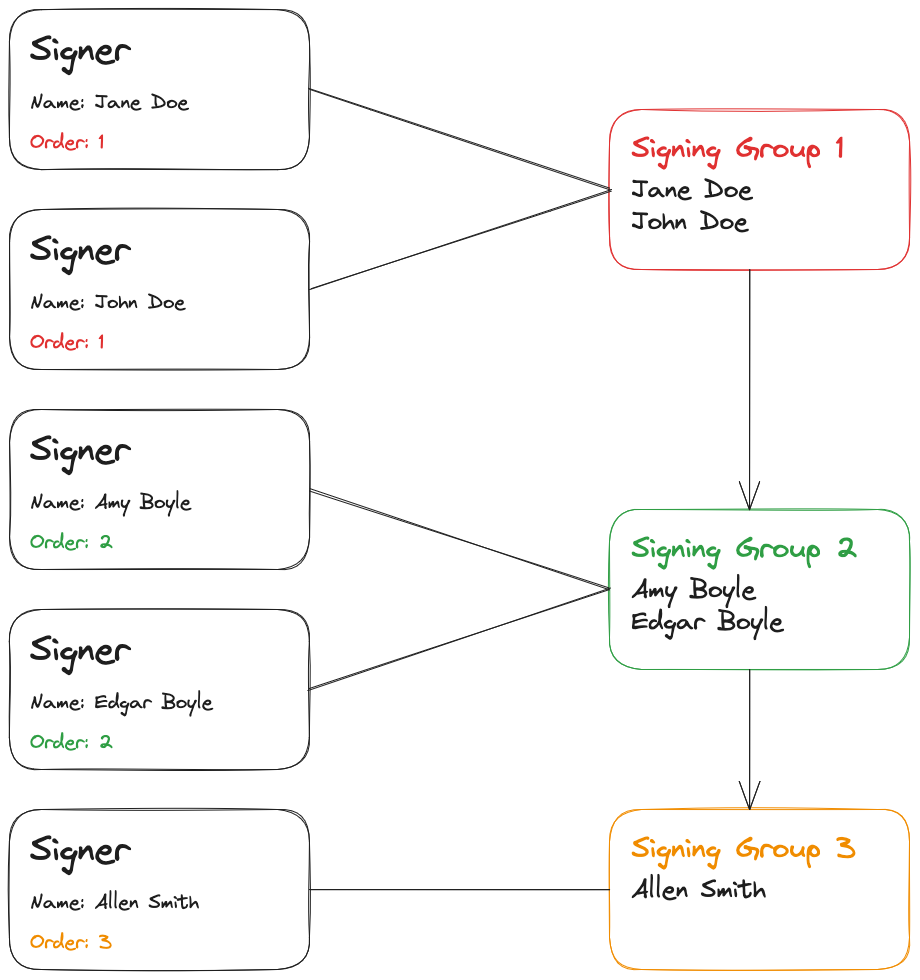
Creating signers according to the above diagram would look like this (some request parameters not important to this example have been omitted to improve clarity):
Http::post("$apiUrl/v1/signatures/$signatureId/signers", [
    'signers' => [
        [
            'order' => 1,
            'firstname' => 'Jane',
            'lastname'  => 'Doe',
        ],
        [
            'order' => 1,
            'firstname' => 'John',
            'lastname'  => 'Doe',
        ],
        [
            'order' => 2,
            'firstname' => 'Amy',
            'lastname'  => 'Boyle',
        ],
        [
            'order' => 2,
            'firstname' => 'Edgar',
            'lastname'  => 'Boyle',
        ],
        [
            'order' => 3,
            'firstname' => 'Allen',
            'lastname'  => 'Smith',
        ],
    ]
]);
Webhook Security
fino.sign currently supports 4 ways of authentication for webhook calls:
- No authentication (default)
- Basic auth authentication
- Bearer token authentication
- HMAC-SHA256 authentication
Basic auth authentication
When Basic Auth authentication is active, all calls to webhooks of an application will include the Authorization
HTTP-Header which contains the provided basic auth credentials base64("username:password").
Example:
Authorization: Basic dXNlcm5hbWU6cGFzc3dvcmQ=
Bearer token authentication
When Bearer token authentication is active, all calls to webhooks of an application will include the Authorization
HTTP-Header which contains the provided bearer token.
Example:
Authorization: Bearer 6biKzGCmXrDeEix7tJyKMdWWr5ou8efG
HMAC-SHA256
When HMAC-SHA256 authentication is active, all calls to webhooks of an application will include an HMAC in the
X-Finosign-Signature header. The HMAC uses the provided secret for signing the message.
The HMAC message concatenates the request timestamp, a nonce and the request body separated with semicolons.
Example:
1699536361075;Uz0T_6gMK1PKw7r6;{"body": "content"}
Verifying the HMAC
- Retrieve the request timestamp from the
X-Finosign-Request-Timestampheader - Retrieve the nonce from the
X-Finosign-Nonceheader - Retrieve the body contents
- Concatenate the above values in order (separated by semicolons (
;)) - Generate a SHA-256 HMAC using the webhook secret
- Compare the generated HMAC with the contents of the
X-Finosign-Signatureheader
Note: for a more detailed description of the headers see below.
Example:
$webhookSecret = '4mCMzgQxgDdOdJ7ivZcH1sj4Lplfld32';
$requestTimestamp = $request->header('X-Finosign-Request-Timestamp');
$nonce = $request->header('X-Finosign-Nonce');
$body = $request->getContent();

$message = $requestTimestamp . ';' . $nonce . ';' . $body;

$hmac = hash_hmac('sha256', $message, $webhookSecret);

if (hash_equals($hmac, $request->header('X-Finosign-Signature'))) {
    // Signature is valid
}
Webhook Headers
| Header | Description |
|---|---|
User-Agent |
The fino.sign user agent. Currently fino.sign API v1 |
X-Finosign-Request-Timestamp |
A unix-timestamp with millisecond precision of the time that the request was sent |
X-Finosign-Nonce |
A random 16 character string. This string will stay the same for all retries of a request |
X-Finosign-Signature |
The HMAC signature (only included if HMAC webhook authentication is used |
X-Finosign-Signature-Algo |
The type of hashing algorithm used for the HMAC generation |
JWT based signing security
To enhance security on non-API endpoints (such as signing URLs or preparation URLs), we provide a feature that requires
any of those URLs to be called with an additional JWT in the secure_token query parameter.
When this feature gets enabled by support, you will be provided with a 4096-Bit RSA private key, that you must use to sign the required JWT with the RS256 algorithm.
The JWT must include the following parameters in its payload:
| Parameter | Expected value |
|---|---|
iss |
The public ID of the app issuing the token (if you don't know this ID, please contact support) |
sub |
The public ID of the signature that the URL is referencing |
aud |
An array of public IDs of the signer(s) that the URL is for (e.g. URLs to signing pages). This parameter can be omitted for URLs that are not signer-specific |
exp |
A UNIX timestamp of when the token expires. We do not enforce an upper limit but encourage using reasonable token lifetimes |
If provided, the iat and nbf values are checked according to RFC 7519.
Types
Signature Quality
The SignatureQuality type represents the different qualities a signature can have.
- Simple Electronic Signature
- Advanced Electronic Signature
- Qualified Electronic Signature
Simple Electronic Signature
This type of quality provides the lowest level of the three legally defined e-signature standards. It is suitable for documents that do not have to conform to a fixed form and for which there is a low liability risk.
Advanced Electronic Signature
The next higher level of the three legally defined e-signature standards. It is legally valid for documents with calculable liability risk for which the law does not prescribe a form. It has a high probative value and is suitable for most types of contracts, such as employment contracts.
Qualified Electronic Signature
The highest level of the three legally defined e-signature standards. It offers the maximum probative value and thus the same legal security as a handwritten signature. It can be used to sign documents with a high liability risk and a legal requirement for written form, such as annual financial statements, in a legally valid manner.